
There is nothing quite like a traditiIf you have recently acquired a Halogen Oven, you might be staring at that glass bowl on your kitchen worktop with a mixture of curiosity and confusion. Is it a spaceship? Is it a glorified grill? Or is it, as many enthusiastic home cooks claim, the secret to slashing your energy bills while enjoying the juiciest roast chicken of your life?
With the cost of living rising across the UK, we are all looking for ways to be smarter with our energy usage. Turning on a massive conventional electric oven just to bake two potatoes or roast a small joint of meat feels increasingly wasteful.
Enter the Halogen Oven.
While they have been around for years, they are enjoying a massive resurgence. They heat up instantly, cook faster than a conventional fan oven, and cost significantly less to run per hour. But – and this is a big “but” – they do not behave exactly like the oven you grew up with.
Many beginners use them once, end up with a burnt-on-top, raw-in-the-middle disaster, and shove the appliance to the back of the cupboard.
Don’t let that be you.
In this comprehensive guide, we will walk through the 7 most common mistakes beginners make, how to fix them, and how to master this incredible appliance to save time, money, and washing up.
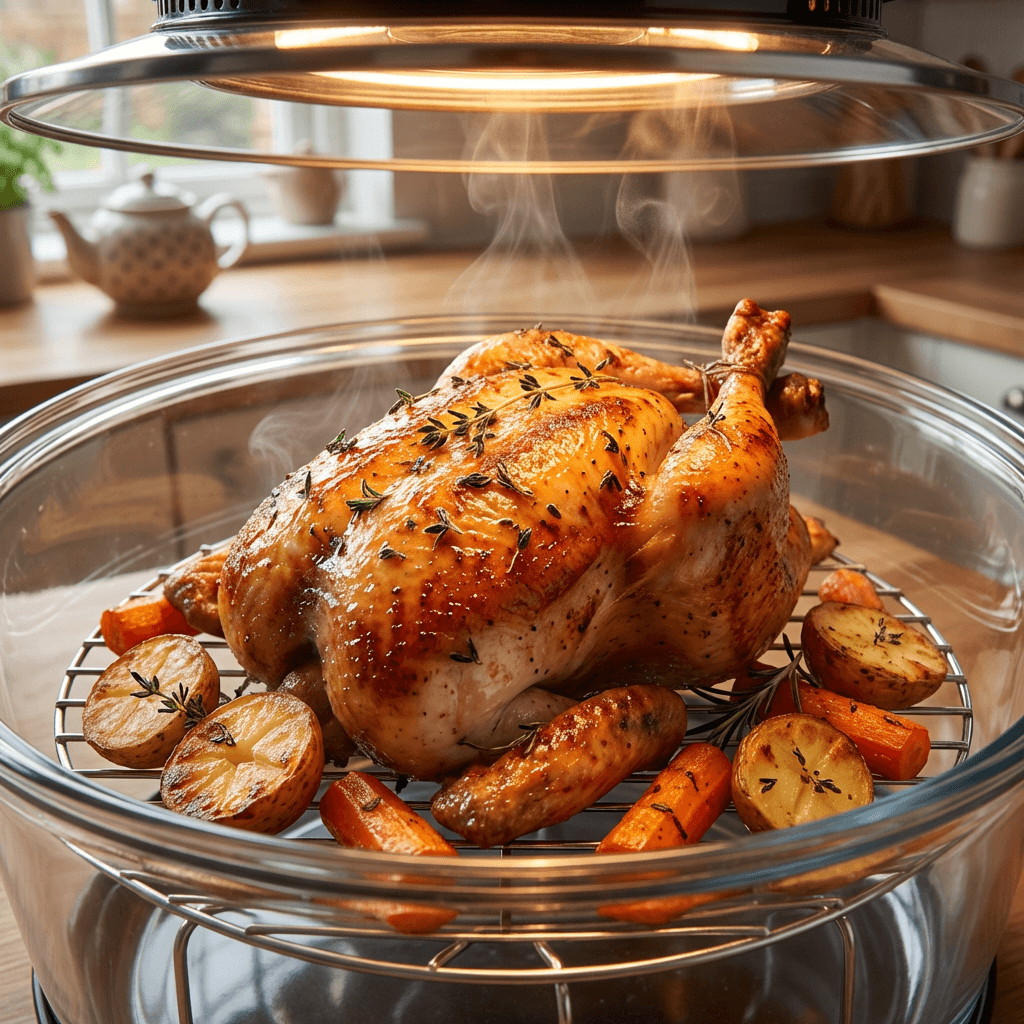
What Exactly Is a Halogen Oven?
Before we dive into the mistakes, let’s briefly clarify what we are working with. A halogen oven is essentially a glass bowl with a lid that contains a high-powered halogen bulb and a fan.
- The Bulb: Generates intense waves of infrared heat (like a grill).
- The Fan: Circulates that heat rapidly around the food (convection).
- The Thermostat: Turns the bulb on and off to maintain temperature.
It is this combination of radiant heat and convection that makes it cook up to 40% faster than a standard oven. But this speed is exactly why you need to adjust your cooking habits.
Mistake #1: Treating It Like a Microwave (Or a Slow Cooker)
This is the most fundamental error. Because it sits on the worktop, many people subconsciously treat it like a microwave. They throw food in, press a button, and walk away.
The Problem:
A halogen oven cooks with intense, direct heat from the top down. If you put a frozen block of meat in there, the outside will incinerate before the inside has even thawed. Unlike a microwave, which excites water molecules inside the food, the halogen oven cooks from the outside in.
The Fix:
Treat it like a super-powered fan oven.
- Thaw first: Always ensure meat is thoroughly defrosted before cooking (unless you are cooking specific frozen foods like chips or nuggets).
- Pre-heating: While many manuals say “no pre-heating needed,” giving it 3 minutes to warm up usually results in a better, more even cook, especially for baking.
Mistake #2: The “Soggy Bottom” Syndrome (Not Using the Racks)
If you watch The Great British Bake Off, you know that a “soggy bottom” is a crime against baking. In a halogen oven, it’s a crime against roasting, too.
The Problem:
Beginners often place food directly on the glass floor of the bowl.
Because the heat comes from the top, the hot air needs to circulate underneath the food to cook it evenly. If your chicken or pie is sitting on the glass, the bottom stays cold and clammy while the top burns.
The Fix:
Always use the racks. Your oven likely came with a High Rack and a Low Rack.
- The Low Rack: This is your workhorse. Use it for roasting whole chickens, baking cakes, cooking casseroles, or anything that needs time. It keeps the food in the centre of the airflow.
- The High Rack: This is essentially your grill. Use it for toast, cheese on toast, browning the top of a shepherd’s pie, or cooking thin cuts of meat like steaks and chops that you want to sear quickly.
Pro Tip: You can cook a whole meal at once! Put your roast potatoes and veg on the Low Rack, and your meat on the High Rack above them. The juices from the meat will drip down onto the veg, adding incredible flavour.
Mistake #3: The “Burnt Offering” (Ignoring the Extender Ring)
Have you ever tried to roast a large chicken, only to find the skin is black and smoking after 20 minutes, but the inside is still raw?
The Problem:
The halogen bulb is very powerful and very close to the food. If you have a large item (like a 1.5kg chicken or a tall cake) on the rack, the top of the food might be only an inch away from the bulb. It’s like staring directly into the sun – you’re going to get burned.
The Fix:
You need to increase the distance between the heat source and the food.
- Use the Extender Ring: Most halogen ovens come with a metal ring (looks like a stainless steel belt). You place this on the glass bowl, and the lid sits on top of the ring. This adds about 2-3 inches of height/volume. It is essential for large roasts and baking bread.
- The Foil Trick: If you don’t have a ring, or if it’s still browning too fast, simply place a loose sheet of aluminium foil over the food for the first half of the cooking time. This reflects the direct heat while allowing the hot air to cook the food through. Remove the foil for the last 15 minutes to brown the skin.
Mistake #4: Overcrowding the Bowl
We all want to save time, so it is tempting to pile everything in at once – sausages, chips, mushrooms, tomatoes, all in a heap.
The Problem:
The halogen oven relies entirely on airflow. The fan needs to push that hot air around every single piece of food. If you pile food up like a mountain, the air hits the top layer and bounces back. The food in the middle of the pile steams instead of roasts, resulting in a soggy, unappetizing mess.
The Fix:
- Single Layers: Arrange food in a single layer on the racks.
- Leave Gaps: Leave space between your potato wedges or chicken drumsticks. You want the “wind” to whistle through them.
- Batch Cook: It is actually faster to cook two batches properly than one huge batch badly. Because the oven heats up instantly, the second batch goes in immediately without waiting.
Mistake #5: Trusting the Mechanical Timer Blindly
Many budget-friendly halogen ovens come with two simple dials: Temperature and Timer. The timer is usually a mechanical “tick-tock” wind-up mechanism.
The Problem:
These mechanical timers are notorious for being slightly inaccurate. A “20-minute” setting might actually cut out after 16 minutes, or run on for 24. Furthermore, because the halogen oven cooks faster than a regular oven, 20 minutes in a recipe book written for a conventional oven might be too long in a halogen.
The Fix:
- Ignore the Dial (Sort of): Set the oven dial to keep it running, but use the timer on your phone or a digital kitchen timer to track the actual time.
- Check Early: A good rule of thumb is to check your food 5-10 minutes before the recipe says it should be done.
- Use a Meat Thermometer: This is the only 100% safe way to know if meat is cooked. For poultry, you are looking for an internal temperature of 75°C.
Mistake #6: The “Watery Grave” (Steaming Instead of Roasting)
Some users add water to the bottom of the bowl when roasting meat, thinking it will keep the oven clean or steam the vegetables.
The Problem:
While adding water is great for steaming vegetables (if you place them on a rack above the water), it is terrible for roasting. The water boils, fills the small chamber with steam, and prevents your roast potatoes or chicken skin from getting crispy. You end up with boiled chicken.
The Fix:
If you want crispy results (roast potatoes, crackling, chips), keep the bowl dry.
If you are worried about fat dripping onto the glass and burning, line the bottom of the bowl with a circle of aluminium foil (tuck it under the bottom rack so it doesn’t blow around). This catches the grease and makes cleanup instant – just scrunch up the foil and bin it.
Mistake #7: Cleaning the Lid Incorrectly (Danger!)
The glass bowl is heavy and can be awkward to wash in a small sink. But the lid is the dangerous part.
The Problem:
The lid contains all the electrical components: the fan, the motor, and the bulb. Beginners sometimes dunk the whole lid in water or put it in the dishwasher. This will destroy your oven instantly.
The Fix:
- The Bowl: Most glass bowls are dishwasher safe (check your manual), or you can use the “Self-Wash” function. Pour in hot water and washing up liquid, set to “Thaw/Wash” for 10 minutes, and watch it swirl clean.
- The Lid: NEVER submerge it. Simply wipe the glass part of the lid with a hot, damp cloth and a little vinegar or glass cleaner once it has cooled down. If grease splatters on the element guard, unscrew the small metal filter (if your model allows) and wash just that piece.
Halogen Oven vs. Air Fryer: Which is Better?
This is the most common question I get asked. Since Air Fryers became the “must-have” gadget, many people think Halogen Ovens are obsolete. They are not. They are different tools for different jobs.
The Air Fryer is better for:
- Speed (for very small portions).
- Chips and breaded snacks (nuggets, fish fingers).
- Reheating pizza.
- Cooking for 1-2 people max.
The Halogen Oven is better for:
- Volume: You can fit a whole large chicken, a joint of beef, or a large cake tin in a halogen. Most air fryers are too small for family roasts.
- Visibility: You can see the food cooking through the glass from all angles without opening the drawer and losing heat.
- Versatility: You can use your own Pyrex dishes, cake tins, and casserole pots inside a halogen oven.
- Price: A good halogen oven is often half the price of a premium air fryer.
If you want to cook a full Sunday Roast for a family, the Halogen Oven wins hands down.
Quick Conversion Guide: Conventional to Halogen
Most recipes in cookbooks are written for conventional ovens. How do you convert them?
The Golden Rule:
Reduce Temperature by 20°C and Reduce Time by 10-15%.
- Recipe says: 200°C for 60 mins.
- Halogen setting: 180°C for 50 mins (then check).
- Recipe says: 180°C for 30 mins.
- Halogen setting: 160°C for 25 mins.
Note: For baking cakes, you might need to lower the temperature even more (by 30°C) and bake for a little longer to ensure the middle cooks before the top burns.
Frequently Asked Questions (FAQ)
Q: Is a halogen oven expensive to run?
A: No. While the wattage (usually 1200W-1400W) is similar to a conventional oven, the halogen oven cooks faster and heats a much smaller space. You don’t waste energy heating a huge metal box. On average, it costs significantly less per meal than a standard electric oven.
Q: Can I use aluminium foil in a halogen oven?
A: Yes, absolutely. It is great for wrapping fish, potatoes, or covering cakes to prevent burning. Just make sure you weigh it down so the powerful fan doesn’t blow it up into the heating element.
Q: Can I bake cakes in it?
A: Yes! Sponge cakes, muffins, and scones come out beautifully. Just remember to use the Low Rack and the Extender Ring if possible to prevent the top from browning too quickly.
Q: Why does the light turn on and off?
A: This is normal. The thermostat turns the halogen bulb off when the desired temperature is reached, and back on when it drops. It’s actually saving you energy when the light is off!
Ready to Cook?
Now that you know what not to do, you are ready to start cooking delicious, energy-saving meals.
The Halogen Oven is a fantastic tool that, once mastered, will likely become the most used appliance in your kitchen. It’s perfect for everything from a quick cheese-on-toast lunch to a full roast dinner with all the trimmings.
Looking for Recipe Inspiration?
Knowing how to use the oven is one thing, but knowing what to cook is another. I am currently finalizing my new ebook, “100 Halogen Oven Recipes”, which includes:
- The Perfect Roast Chicken (crispy skin guaranteed!)
- One-Pot Stews (no stirring required)
- 30-Minute Cakes & Bakes
- Healthy “Fried” Chicken
Stay tuned to the blog for the launch date. In the meantime, dust off that glass bowl, grab a chicken, and give it another go using these tips. You won’t be disappointed.

